
“ActiveWoo made our email marketing seamless! 🚀 Sales increased, and automation saved us hours.”
Running an online store is exciting. Every order is a small win. But soon you realize that having products and a checkout isn’t enough. You need to start building a genuine relationship with your customers, following up, reminding them of their carts, and sending personalized offers.
You use WooCommerce to power your store and have signed up for ActiveCampaign to handle your email marketing. But something was missing.
Despite having both tools, they were not truly talking to each other
You felt like you had all the pieces but no glue. That’s where ActiveWoo comes in.
ActiveWoo is a WordPress plugin that connects your WooCommerce store with ActiveCampaign, an advanced email marketing and automation platform. It automatically syncs your WooCommerce data, orders, and customer behavior with your ActiveCampaign account.
Because WordPress alone can’t do automation, and ActiveCampaign alone can’t sell products. They work as a powerful team:
On the Checkout Page, follow these steps: Choose your preferred payment method.
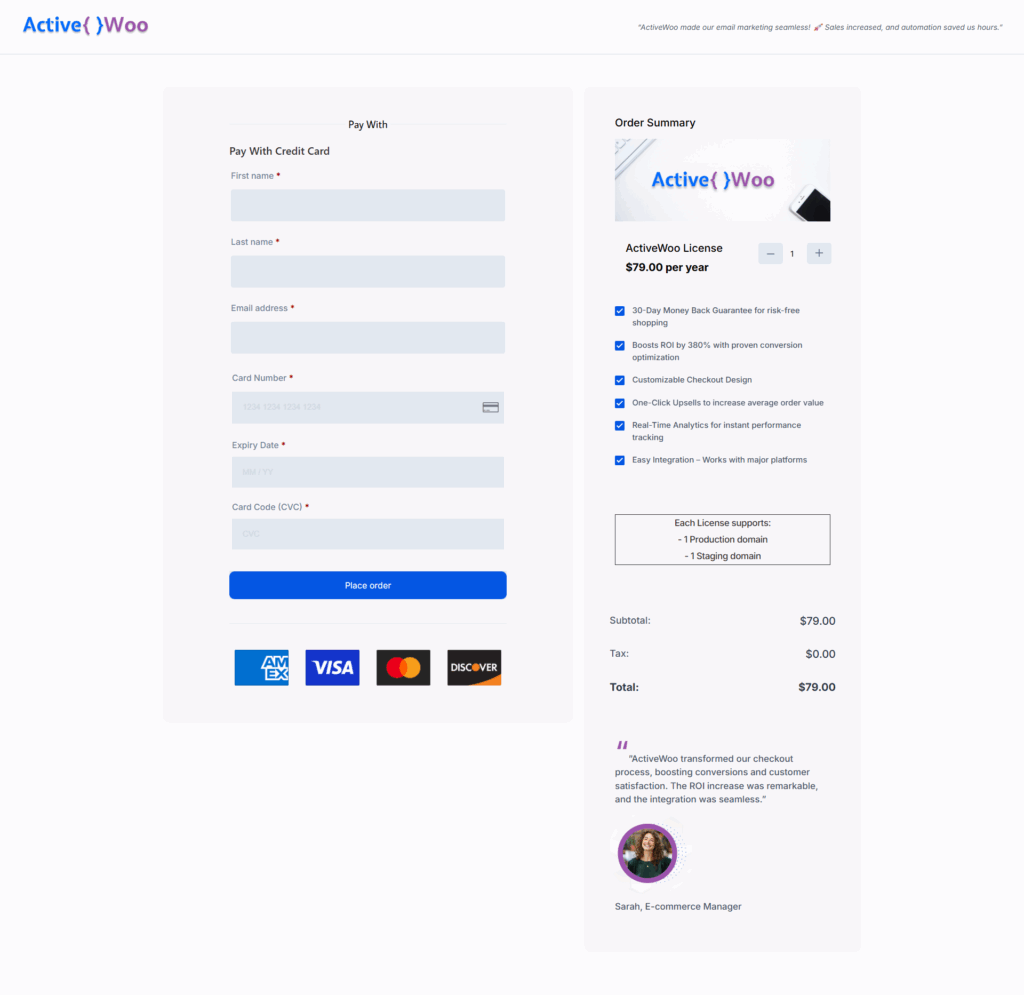
Be sure to save this information for future reference.

That’s it! ActiveWoo is now installed and ready to integrate your WooCommerce store with ActiveCampaign.
You’ve just purchased the ActiveWoo plugin. Congratulations! You’re one step closer to automating your WooCommerce and ActiveCampaign workflows.
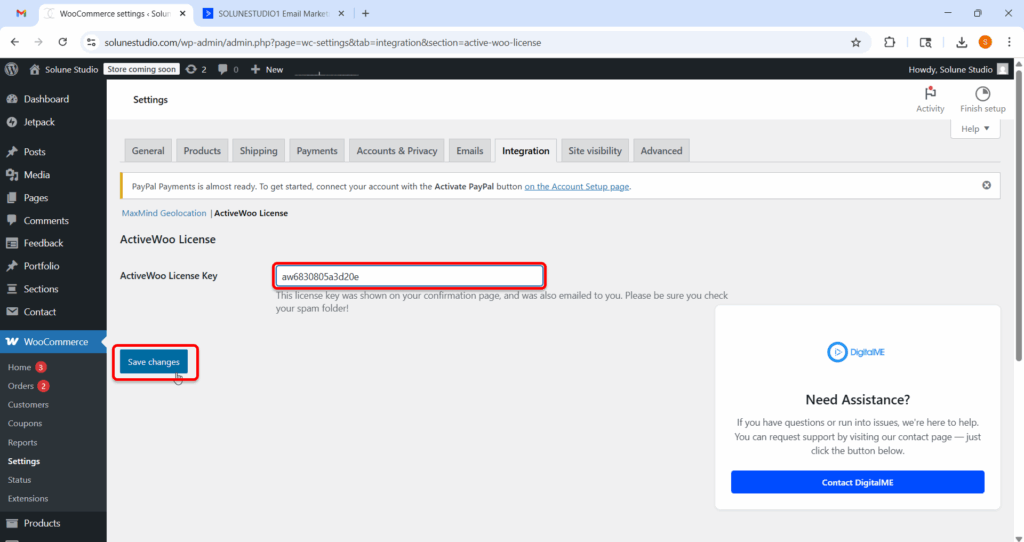
Now it’s time to activate your plugin:
Click “Save Changes” to activate your license.
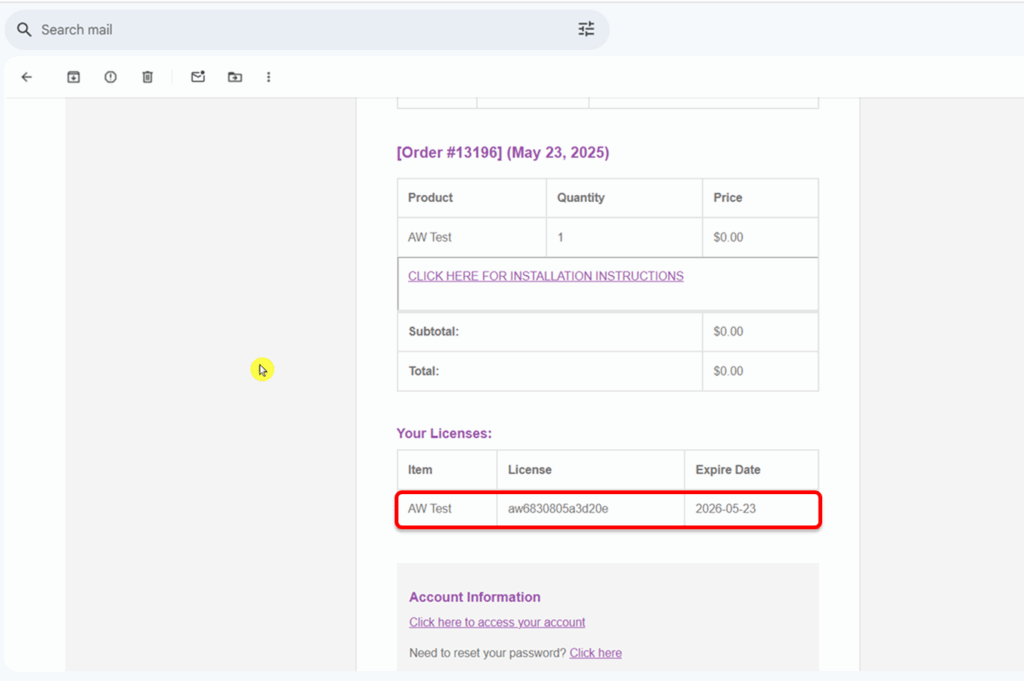

Here’s how to find them:
Now go back to your WordPress dashboard:
That’s it! Your ActiveWoo plugin is now licensed and successfully connected to your ActiveCampaign account. You’re ready to automate your marketing like a pro.
This section covers every major feature in the ActiveWoo plugin settings, explaining what each option does, why it matters, and when to use it. These options help ensure your WooCommerce store integrates seamlessly with ActiveCampaign for maximum marketing and automation impact.
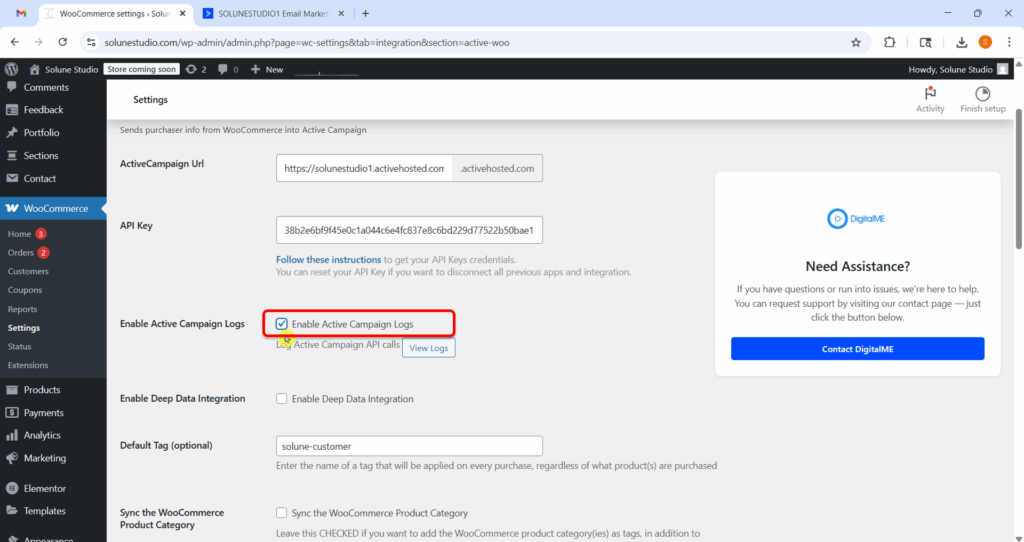
This feature turns on logging for all API calls made between your WooCommerce store and ActiveCampaign.
In simple terms, whenever ActiveWoo sends or receives data (like syncing an order, customer info, or applying tags), it keeps a record of that interaction.
You can view these logs by clicking the “View Logs” button next to it.
Why it’s helpful:
This is like turning on the security camera for your automation. If something goes wrong, like a tag didn’t apply, or a sync failed, you can:
Leave this checked, especially during setup or testing.
It doesn’t slow down your store, and having logs can save time when you’re trying to figure out why something didn’t sync correctly.
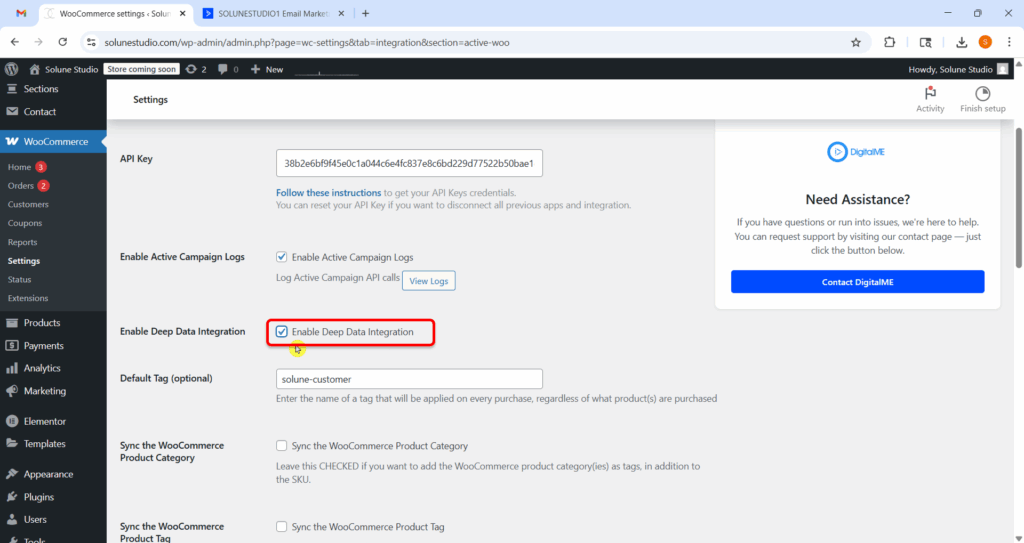
This allows ActiveWoo to send advanced customer and order data into ActiveCampaign, not just basic info like name or email.
Why it’s helpful:
With Deep Data, you’ll be able to see each customer’s full order history inside ActiveCampaign. That means you can build smarter automation like:
So leave this checked; it unlocks the most powerful features.
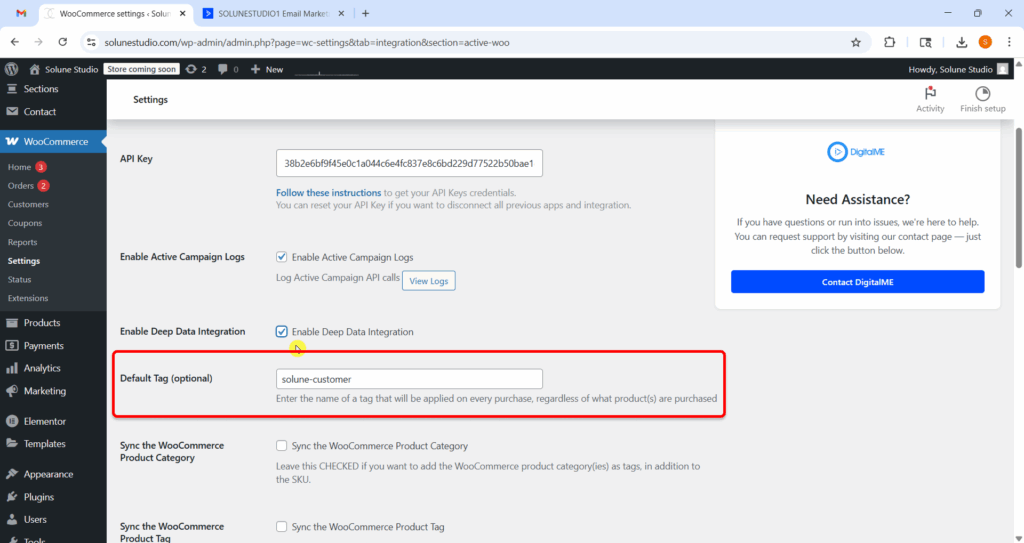
This is a tag that gets applied to every customer who places an order, no matter what they buy.
Why it’s helpful:
You can use it to group all your paying customers. For example, if you enter
[(your storename)-customer],
Every buyer will be tagged with that in ActiveCampaign.That way, you can easily filter your list to send a “thanks for being a customer” campaign or exclude buyers from promotional emails.
Tip: Add a general tag like customer or buyer here.
This option adds the product category of each purchased item as a tag in ActiveCampaign.
Why it’s helpful:
Let’s say you sell skincare and your products are in categories like “Cleansers”, “Moisturizers”, or “Serums”. If a customer buys something from “Serums”, that tag gets added automatically.
You can now build automations like:
“If someone buys from the Serums category, send them a guide on how to layer skincare.”
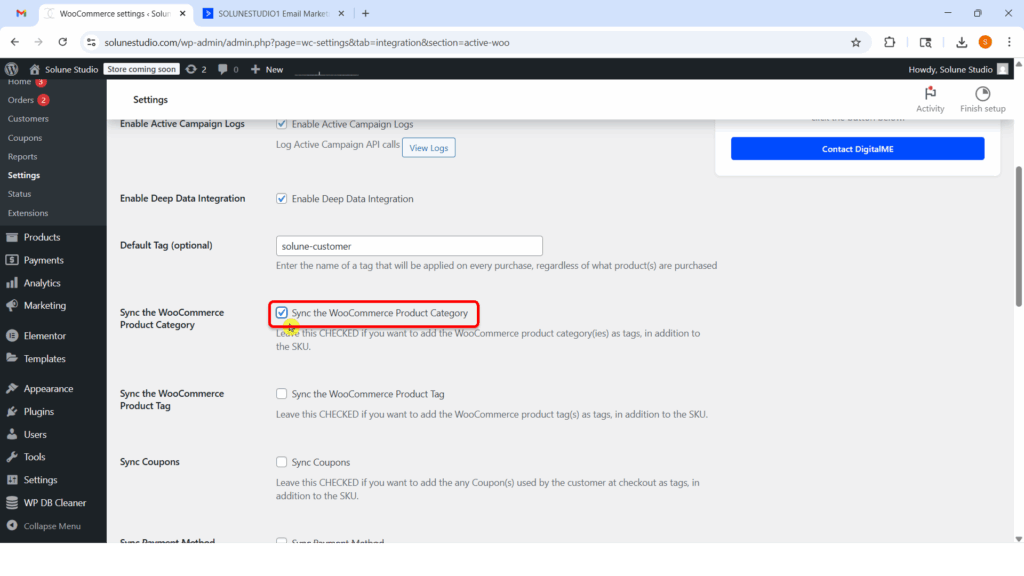
Check this so you can have more targeted follow-ups based on product categories.
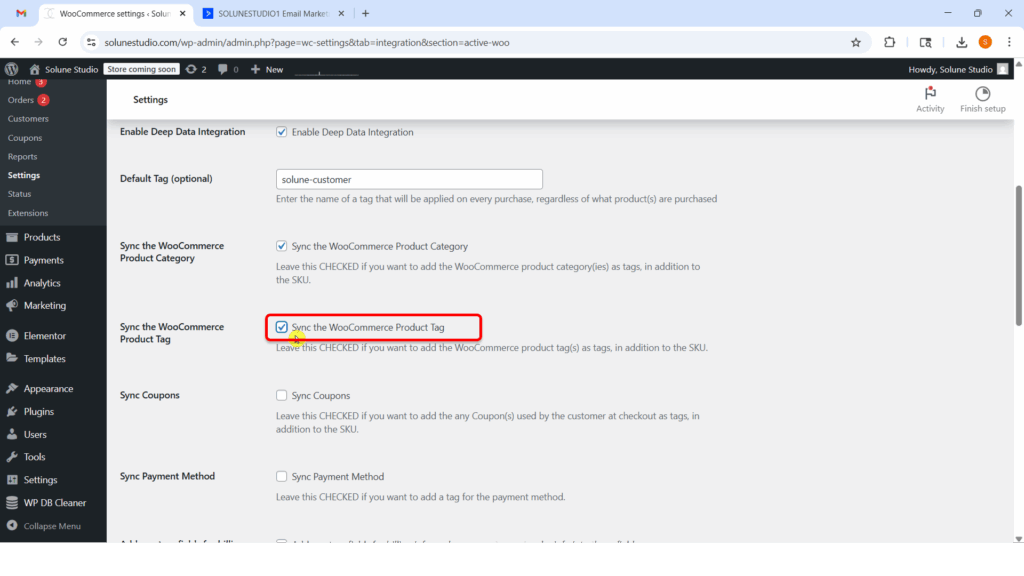
Just like categories, this adds product tags as tags in ActiveCampaign when someone makes a purchase.
Why it’s helpful:
Tags are often used for more specific labeling than categories. For example, a product could be tagged as “Vegan”, “Fragrance-Free”, or “Limited Edition”.
You could then trigger automations like:
“Send a reminder before the Limited Edition product runs out.”
Check this if you’re using WooCommerce product tags in your store.
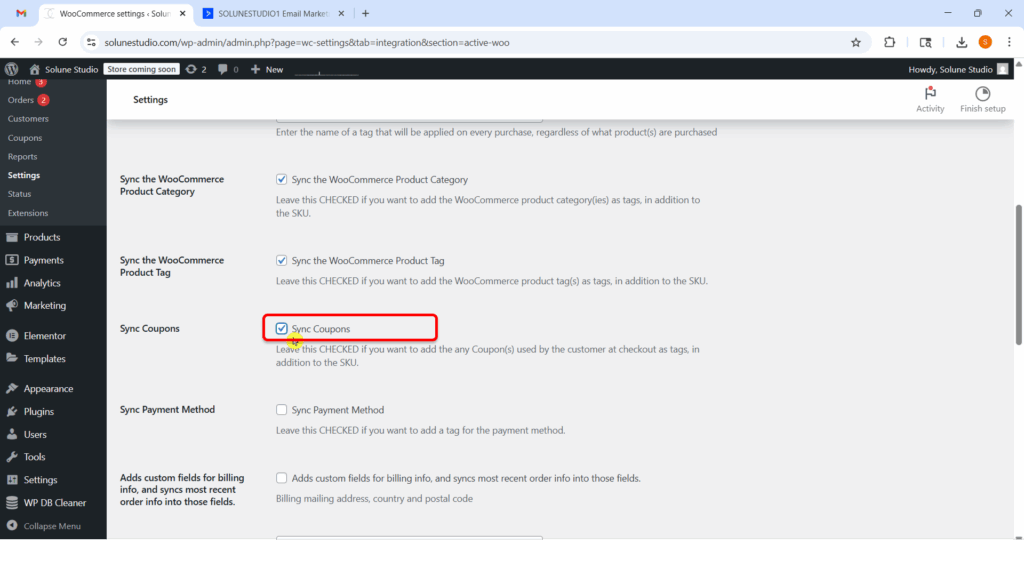
What it does:
This feature allows you to tag customers based on the coupon code they use during checkout. If a customer uses a coupon code during checkout, that coupon name is sent as a tag to ActiveCampaign.
Why it’s helpful:
Let’s say you sent out a “SUMMER10” discount campaign. When someone uses that code, they’ll get tagged with SUMMER10.
Now you know which customers engaged with that promo, and you can:
Recommended if you run promotions or coupon-based marketing.
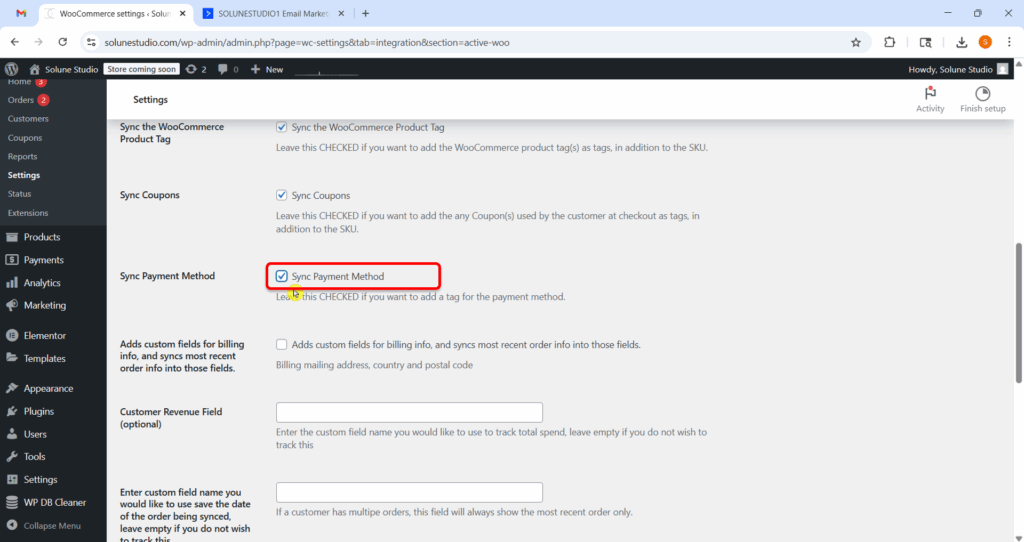
This sync payment method feature adds a tag for the payment method the customer used (like PayPal, Stripe, or Bank Transfer).
Why it’s helpful:
This might not seem important at first, but it can be great for:
Leave this checked unless you’re sure you’ll never use payment-based automation.
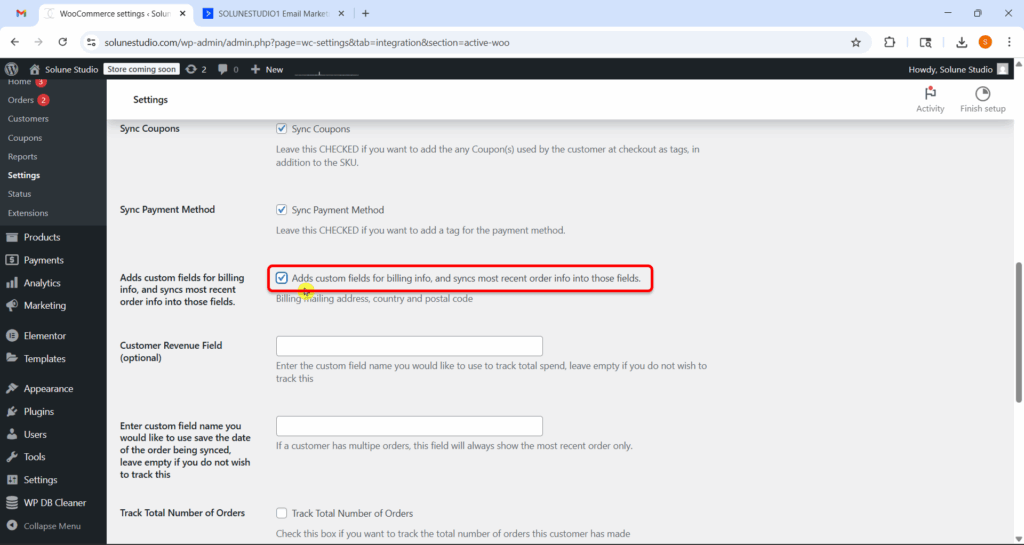
This feature syncs your customer’s most recent billing details (like address, country, and postal code) from WooCommerce orders and sends it to ActiveCampaign, storing it in custom fields.
Why it’s helpful:
Let’s say you want to send emails based on location (“Hey USA customers, check this out!”). This field gives you that power by syncing the customer’s most recent billing info.
Keep this checked, it adds more customer data to your CRM, which is always helpful for segmentation.
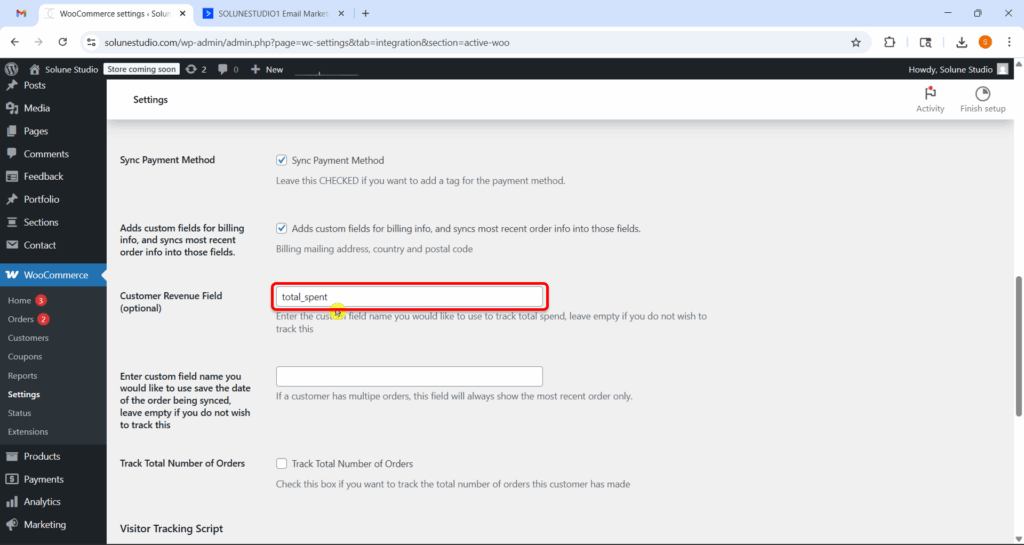
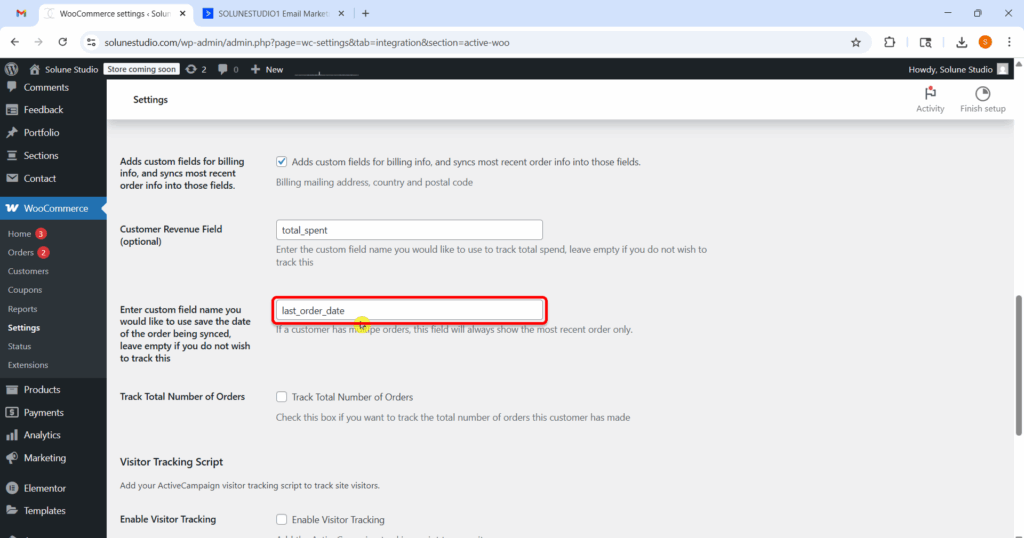
This feature lets you specify a custom field in ActiveCampaign (e.g., total_spent or customer_lifetime_value) where the total amount a customer has spent on your site will be stored.
Why it matters:
By tracking customer revenue, you unlock powerful opportunities for automation. For example:
Use this if you want to build revenue-based automation or customer segmentation. If you’re not ready to track revenue yet, you can leave it blank; however, it’s a smart feature to activate.
We now have the Order Date field option here. You can enter a custom field name to store the date of the most recent order.
If a customer orders multiple times, this field will update with the newest purchase date each time.
Why it matters:
This is super useful for:
Tip: Use something like last_order_date.
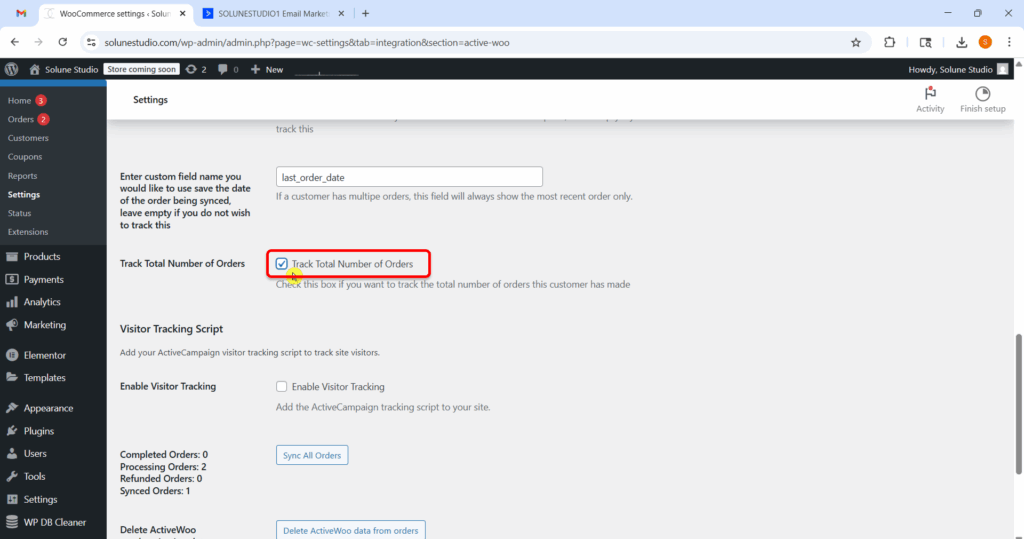
Next, we have this “Track Total Number of Orders” feature. By enabling this option, ActiveWoo will keep count of how many total orders a customer has placed and store that number in ActiveCampaign.
Why it matters:
This field helps you:
This feature is highly recommended, more data = better automation possibilities.
What it does:
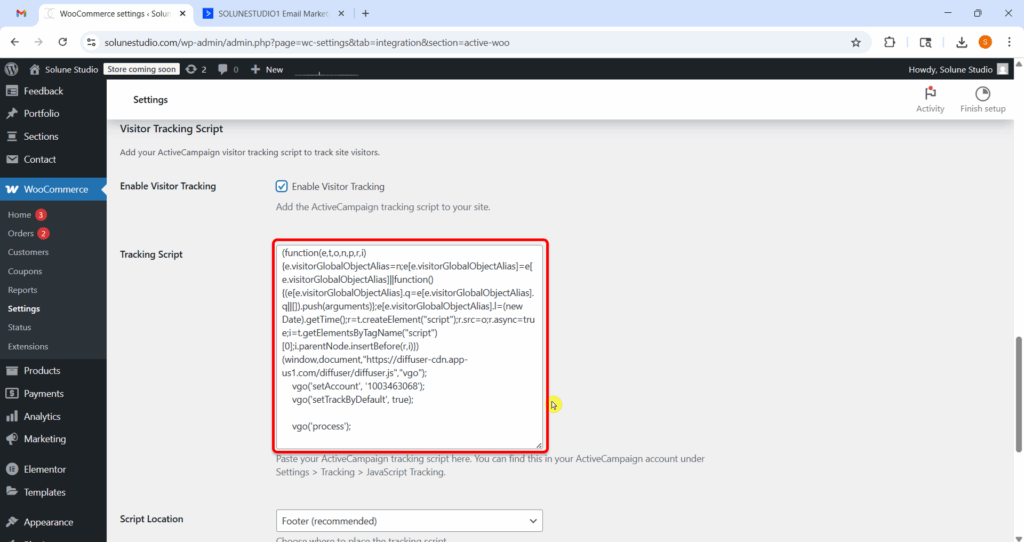
This feature allows you to enable ActiveCampaign’s visitor tracking script on your website. Once activated, it gives ActiveCampaign the ability to monitor the behavior of your known contacts as they interact with your site.
Think of it as giving ActiveCampaign a behind-the-scenes view into user activity, helping you understand:
Why is this valuable?
By capturing this level of insight, you can build smarter automations, send more relevant emails, and time your follow-ups based on actual user interest, not just guesswork.
📌 Note: This only works for contacts who are already known (e.g., they’ve filled out a form or clicked a tracked email), so it’s most powerful when combined with forms and campaigns.
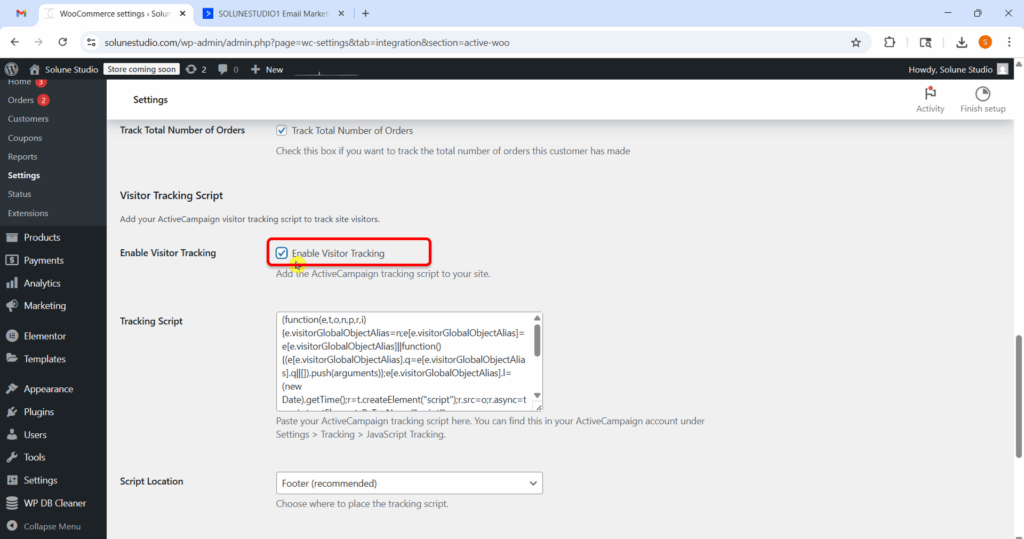
This is where you have to paste your ActiveCampaign tracking script, which allows you to monitor your registered or known visitor behavior on your WooCommerce site.
Where to find the script:
In your ActiveCampaign account:
Settings → Tracking → Site Tracking. Copy the JavaScript snippet provided there.
Why use it:
This tracking lets you:
Note: Only works for identified contacts (visitors who have submitted a form or clicked a tracked link in an ActiveCampaign email).
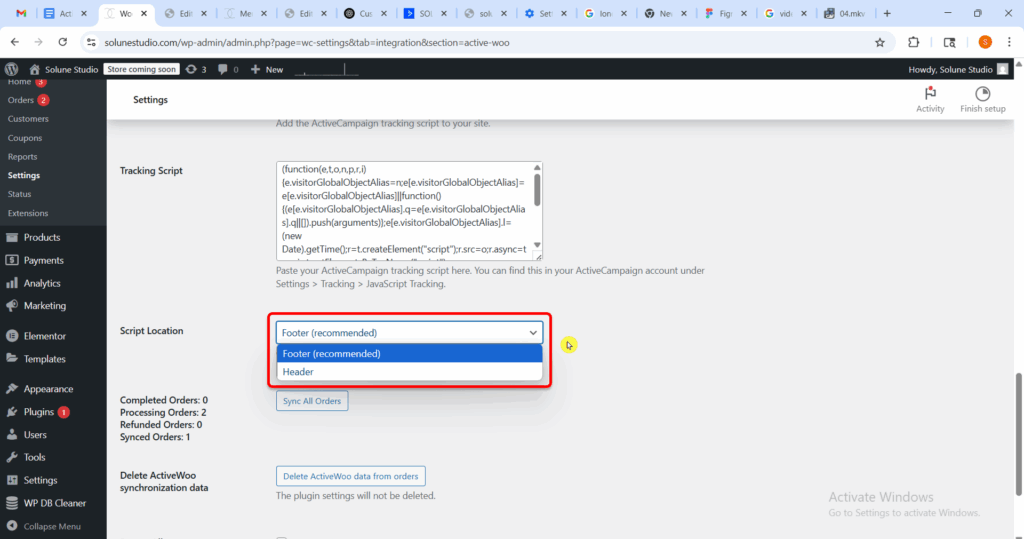
This setting controls where the ActiveCampaign tracking script is inserted on your website. It plays an important role in balancing tracking accuracy with overall site performance.
Available Options:
Recommendation:
Keep this set to Footer unless you have a specific reason to track user behavior as soon as the page starts loading. Most sites and use cases will work perfectly fine and more efficiently, with the script placed in the footer.
This section gives you a real-time summary of the different types of WooCommerce orders in your store and how many of them have already been synced to ActiveCampaign.
Here’s what each count means:
Why This Matters:
This overview acts as a quick health check for your WooCommerce → ActiveCampaign integration. It helps you:
By regularly monitoring this section, you can make sure that your customer and order data in ActiveCampaign stays accurate and up to date.

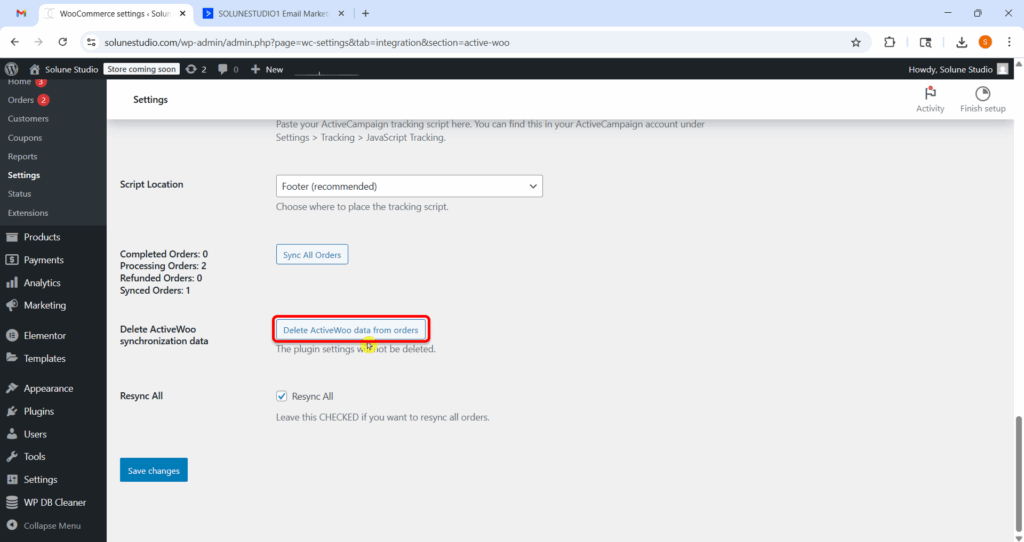
This option allows you to remove all synchronization metadata that ActiveWoo has stored in your WooCommerce orders.
Important: This does not delete your actual WooCommerce orders or the ActiveWoo plugin settings; it only clears the internal sync markers used by ActiveWoo to track which orders have already been synced to ActiveCampaign.
When to Use This:
Recommendation:
Use this with care. It’s a safe action in terms of data retention (your orders remain intact), but it will cause all orders to be reprocessed for syncing, which may take time depending on your order volume.
Finally, let’s talk about the exciting Resync All feature! When you check this box, get ready for a fresh start: the next time you hit “Sync All Orders,” every single order will be reprocessed and synced once again, no matter if they’ve already been synced before. It’s like giving your orders a second chance to shine!
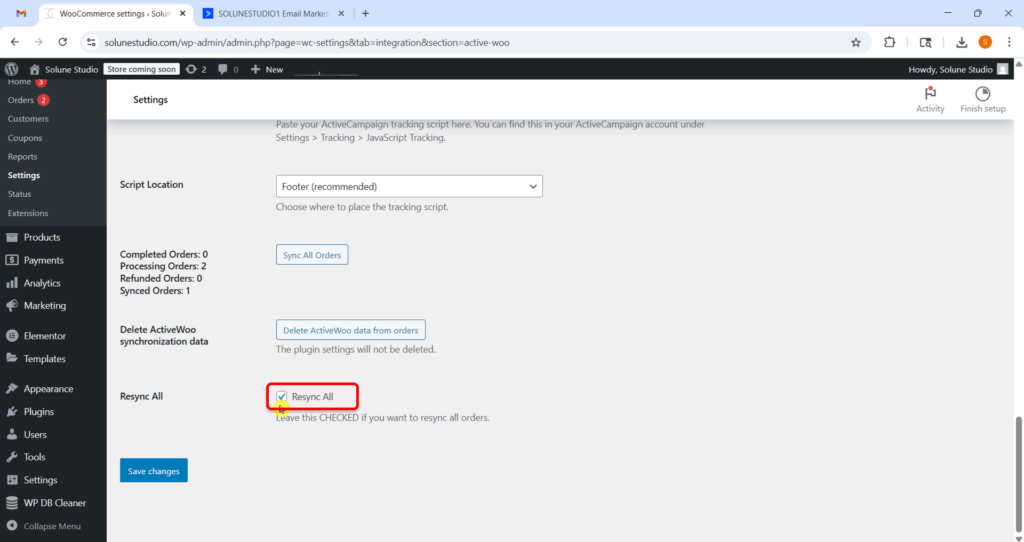
Use this when:
Don’t forget to hit that “Save Changes” button to secure all your settings! Your preferences matter, so let’s make sure they’re locked in!

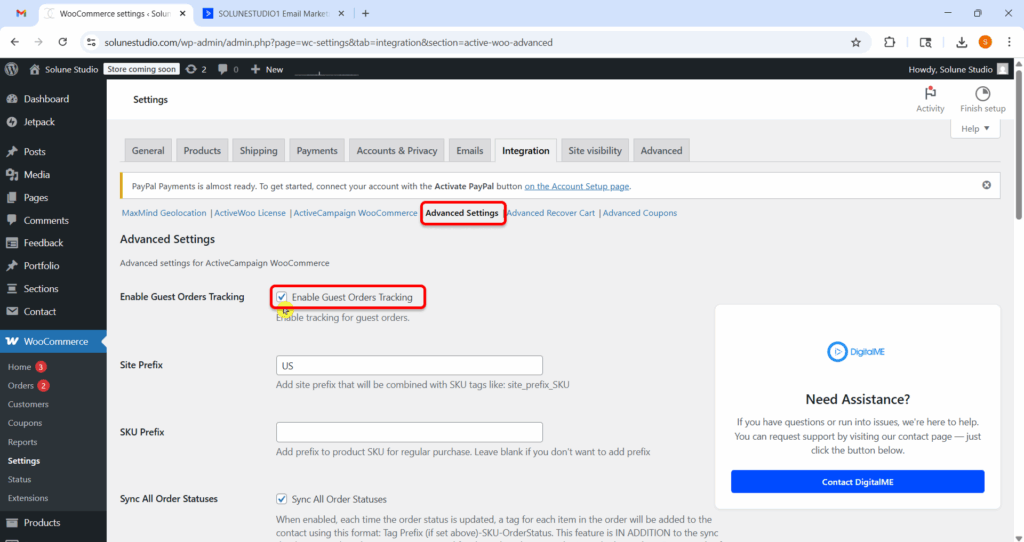
The Advanced Settings tab gives you fine-grained control over how your WooCommerce data is synced to ActiveCampaign. This guide explains each option in detail to help you configure your store for optimal performance and tracking.
This feature allows ActiveWoo to track and sync orders placed by guest customers, those who check out without creating an account.
Why it’s important:
By enabling this setting, you ensure that valuable customer and order data from guest checkouts isn’t lost. These customers can still be added to ActiveCampaign, allowing you to trigger post-purchase emails, follow-ups, or nurture sequences, even if they didn’t create an account.
When to enable it:
If your store supports guest checkout (which most WooCommerce stores do), it’s recommended to leave this enabled for complete tracking and automation coverage.
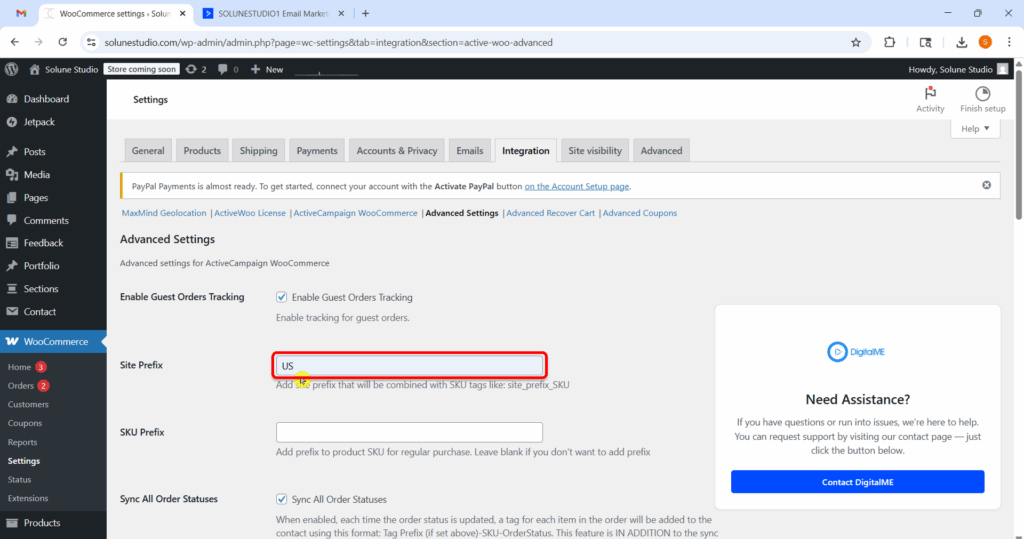
Before you try this feature, let me tell you about the site Prefix. The Site Prefix is a short label you assign to your store or website. It helps ActiveCampaign identify where your product or order data is coming from, especially useful if you manage multiple WooCommerce stores.
Example:
Let’s say you run two separate WooCommerce stores:
You decide to set the Site Prefix as:
Now, suppose you’re selling the same product (let’s say a T-shirt with the SKU TSHIRT001) on both stores. Thanks to the Site Prefix, now this is what ActiveCampaign will receive:
Even though the product SKU is the same, the prefix makes it unique and traceable to the right store.
Why it’s useful:
Managing multiple stores on a WordPress Multisite network? ActiveWoo’s Multisite Tagging feature is here to keep your tags organized and your CRM data crystal clear.
With this feature, tags (like SKUs or product names) are automatically prefixed with the name of the subsite they came from. It’s a small detail that makes a big difference when it comes to segmenting your audience in ActiveCampaign.
If a customer makes a purchase on your “Home” subsite, the tag will look like:
Home-SKU123
If the same product is bought on your “Away” subsite, the tag will show up as:
Away-SKU123
That simple prefix keeps your tags tidy, trackable, and tied to the right store. No confusion. No duplicates. Just clean, organized data flowing into ActiveCampaign.
Heads-up: Multisite tagging is a Pro feature and only works if you have more than one ActiveWoo license. If you’re running a single-site setup, this feature will be turned off by default.
Even if you don’t have multisite mode enabled, you can still simulate this behavior using the “Site Prefix” setting found in each integration tab. This option lets you define a custom prefix (e.g., Home-), which will be added to all tags sent from that particular site.
This is especially helpful if you’re managing multiple brands or store versions manually and want cleaner, more traceable tags in your CRM.
Running multiple stores or brand sites under one WordPress multisite setup? Then, multisite tagging is about to become your new favorite feature.
Here’s why it’s a game-changer:
SKU stands for Stock Keeping Unit, it’s a unique identifier for a product, often used to track inventory.
A SKU Prefix is a custom tag or label added before the original SKU to help further organize or categorize products.
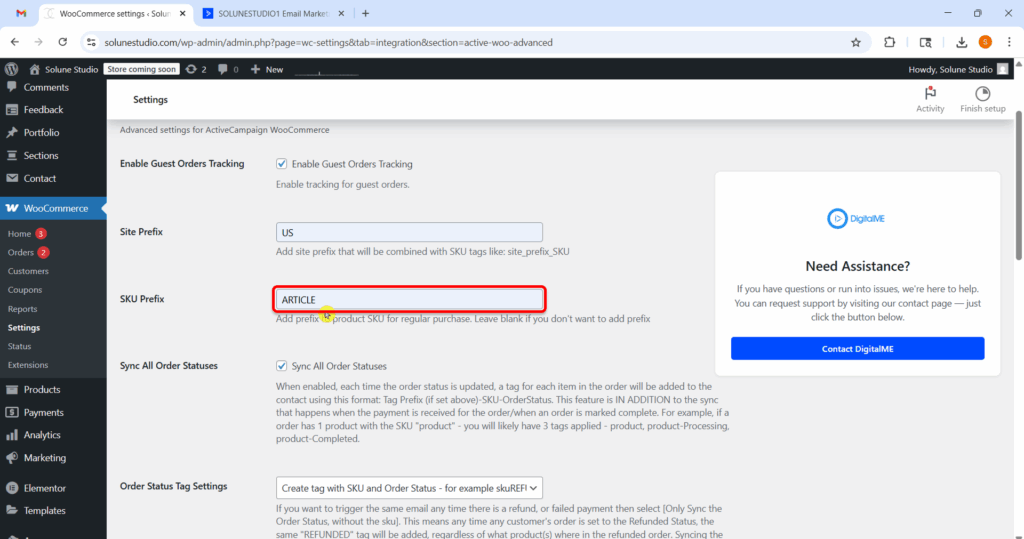
It helps you group, filter, or segment products more easily in marketing tools like ActiveCampaign.
Think of it like adding a label in front of each product code, so you know what kind of product it is without looking it up.
Simple Example
Let’s say your WooCommerce store sells two types of products:
You have these Product SKUs:
Now, let’s say you want to add a SKU prefix to all T-shirts, so they are grouped in ActiveCampaign.
You set: SKU Prefix = SHIRT_
Now, when your WooCommerce data is synced, the Product SKU TSH001 with SKU Prefix will become:
SHIRT_TSH001→`This is what ActiveCampaign will get.
In ActiveCampaign, you can now:
“Hey! You left a SHIRT in your cart, complete your order and get 10% off!”
Without a prefix, you’d have to remember random codes like TSH001 or TSH002. With the prefix, you see SHIRT_TSH001 and know exactly what it is.
If you’re also using the Site Prefix, it works like this:
Final synced SKU:
US_SHIRT_TSH001
| Setting | The input you give | What ActiveCampaign will get |
| Product SKU | TSH001 | TSH001 |
| SKU Prefix | SHIRT_ | SHIRT_TSH001 |
| SITE Prefix | US+SHIRT | US_SHIRT_TSH001 |
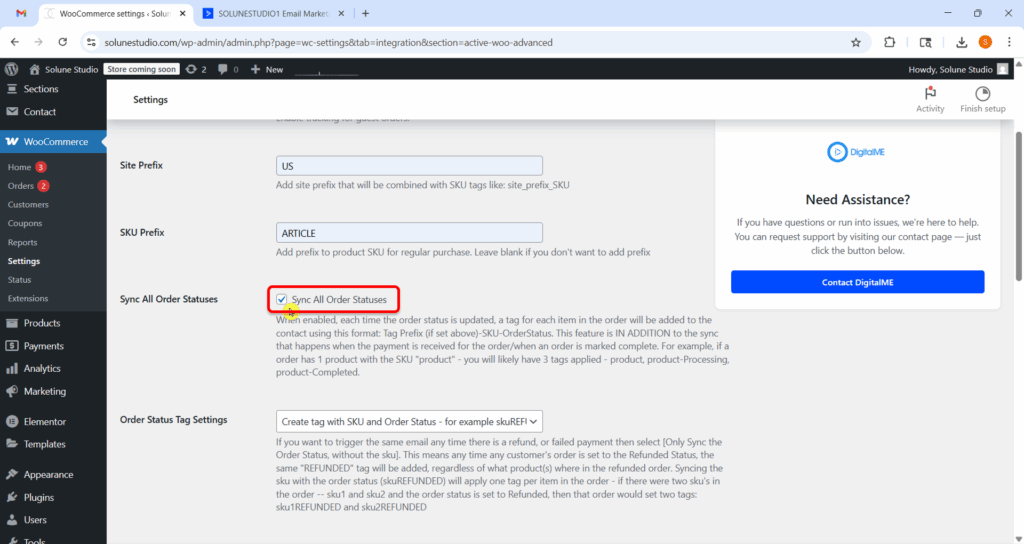
When this setting is enabled, ActiveWoo will sync tags for all WooCommerce order statuses, not just for orders marked as Completed.
Why you should enable it:
This allows you to track and trigger automations in ActiveCampaign for a wider range of order scenarios, including:
When to use it:
Enable this if you want comprehensive order data in ActiveCampaign and wish to build automations that respond to the full lifecycle of an order, not just successful purchases. For example:
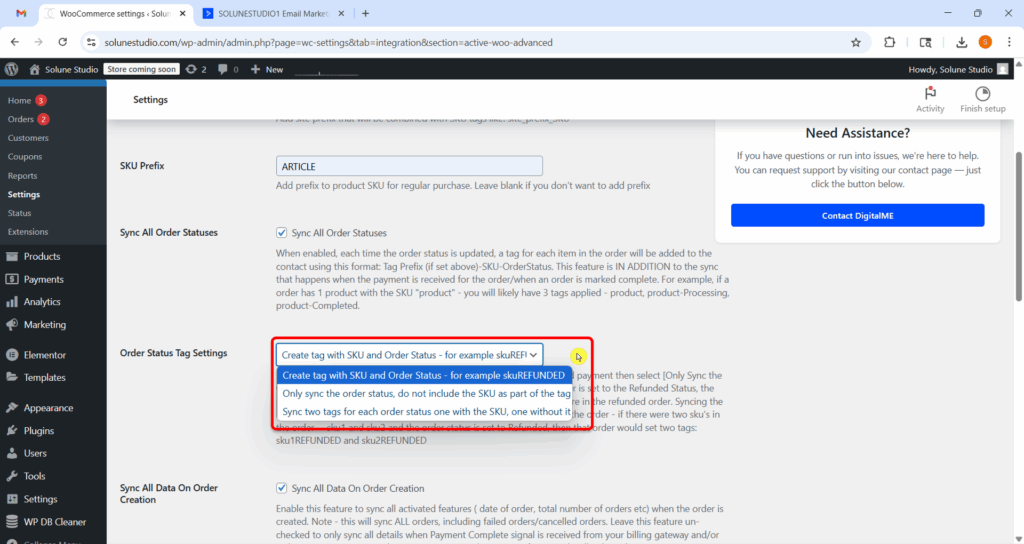
This setting controls how tags are formatted and sent to ActiveCampaign when syncing WooCommerce order statuses. You have three options to choose from:
What it does:
Generates tags by combining the product SKU and the order status into a single tag.
Example:
If the SKU is skuREF and the order status is Refunded, the synced tag will be:
skuREFUNDED
Best for:
Stores that want detailed tagging to track product-level status changes. Perfect for targeting customers who had issues with specific products.
What it does:
Creates a tag only with the order status, and does not include the SKU in the tag.
Example:
Regardless of the product SKU, a refunded order will simply generate the tag:
REFUNDED
Best for:
General automations based on order state, not tied to specific products. Useful if you only care that a refund happened, not what item was refunded.
What it does:
Sends two tags for each order:
Example:
For a refunded item with SKU sku2, two tags will be sent:
Best for:
Maximum flexibility. This allows you to run both product-specific and status-specific automations in ActiveCampaign.
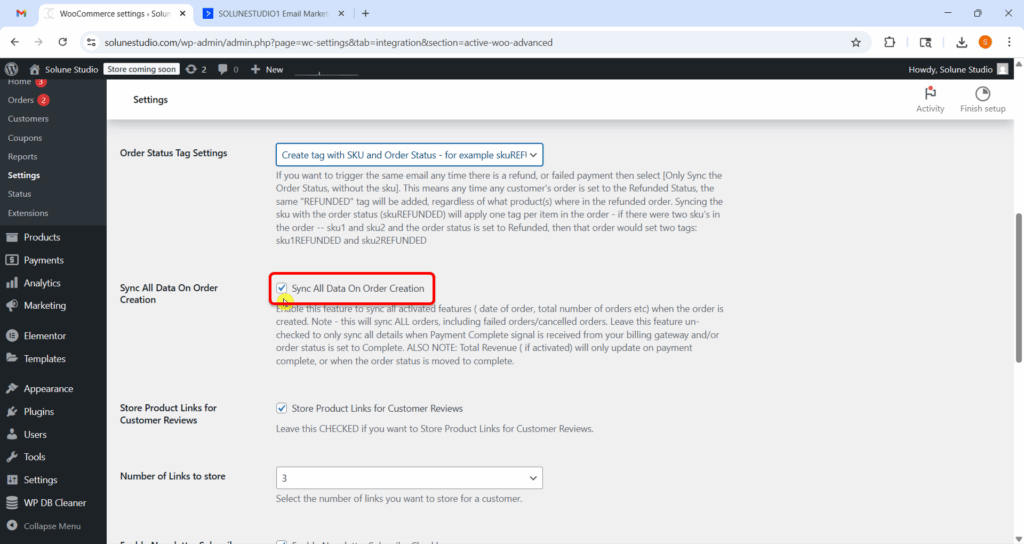
This feature allows ActiveWoo to instantly sync all order-related data to your connected ActiveCampaign account as soon as an order is created in WooCommerce.This includes: Order date, Total orders, Customer details, and any other tracked fields
This feature allows you to store links to purchased products within ActiveCampaign. These can be used to send automated review requests.
Recommendation:
Keep this enabled if you’re running post-purchase email campaigns to collect product feedback.
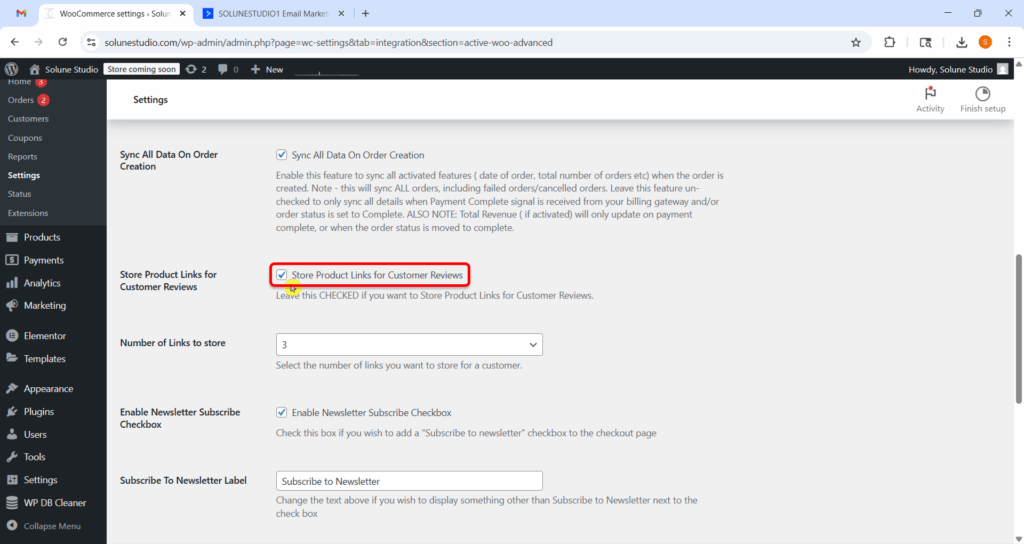
You can also limit how many product links are stored per customer for review campaigns.
Example:
Set this to “3” to only store the 3 most recent product links from an order.

Now you can add a “Subscribe to Newsletter” checkbox to your checkout page.
This feature allows customers to opt in to your marketing emails during the checkout process, making it an excellent way to grow your email list.
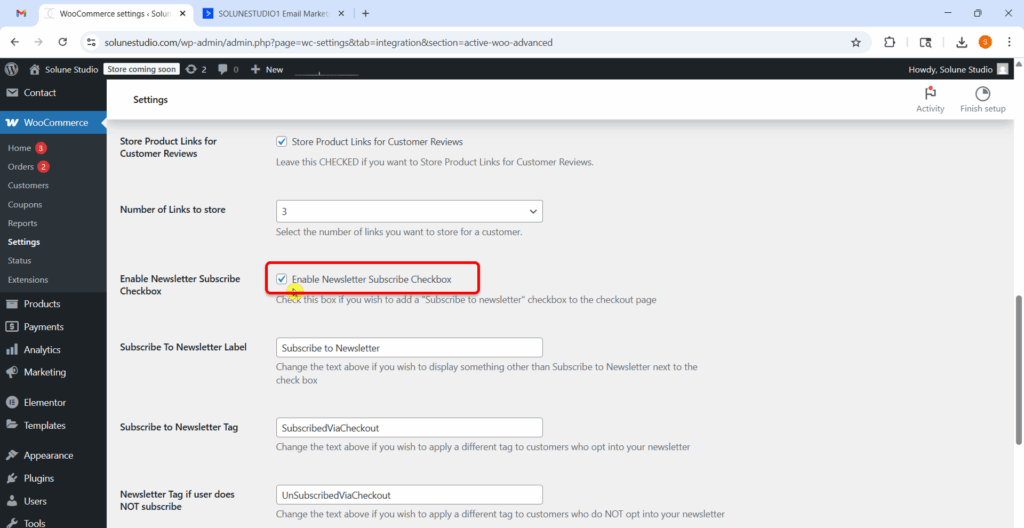
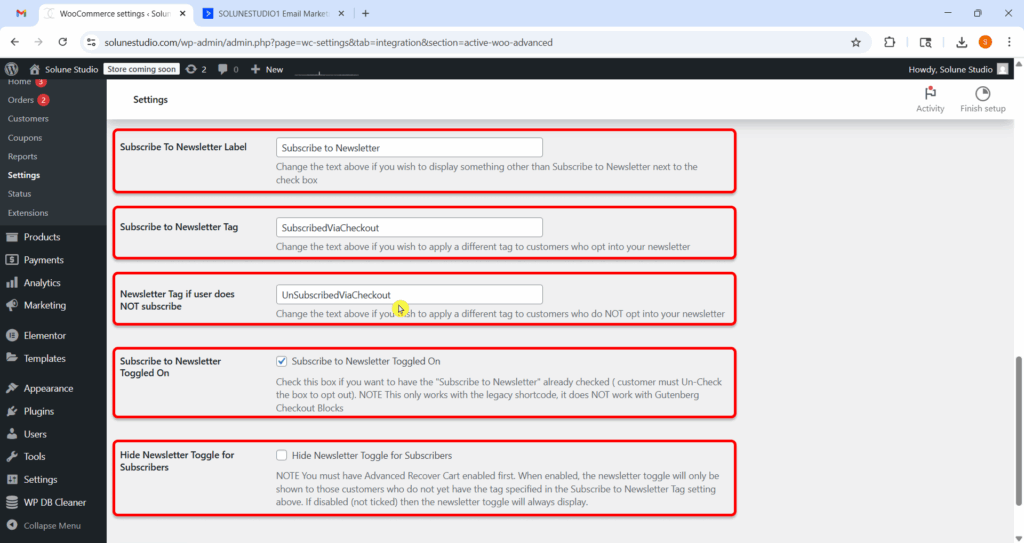
Make your choice more personal: Now you can change the default text that appears next to the newsletter signup checkbox.
For example, you could say: “Absolutely! I want to be the first to know about exciting updates and exclusive offers!”
Now let’s set a tag that gets applied in ActiveCampaign when customers eagerly opt in through the newsletter checkbox.
This step is pivotal because it empowers you to segment your audience effectively and automate tailored communications based on user consent. By understanding who is interested, you can provide content that truly resonates and enhances engagement, creating a more personalized experience for your subscribers!
This feature applies a different tag to users who do not check the newsletter box at checkout.
Use Case:
Helps you suppress email sends to those who haven’t opted in, useful for compliance and clean list segmentation.
Now toggled on this option so you can keep the newsletter checkbox checked by default at checkout.
Note:
This only works with the legacy shortcode checkout (not supported in Gutenberg blocks).
Important:
Customers can still uncheck the box to opt out.
Now, toggle on this option if you want to hide the newsletter checkbox for users already tagged as subscribers in ActiveCampaign.
Requirement:
You must have the Advanced Recover Cart feature enabled for this to work.
Why Use It:
Avoid showing opt-in prompts to users who’ve already subscribed, improving the checkout experience.
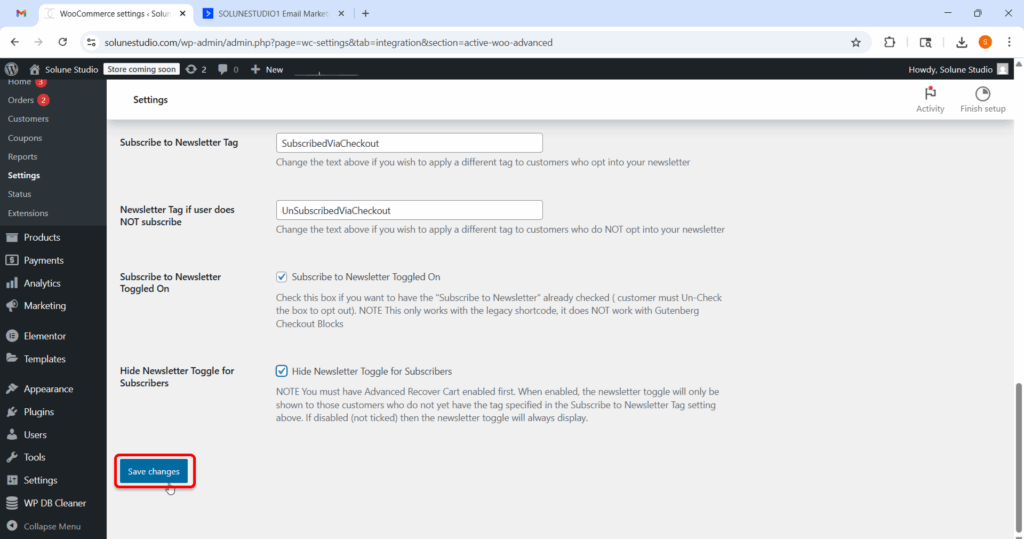
Once you’ve made your adjustments in this section, don’t forget to scroll down and hit “Save changes” to make your settings take effect. Your updates deserve to be saved!
Sometimes customers add items to their cart but leave your store without buying. It happens all the time, maybe they got distracted, wanted to compare prices, or just weren’t ready yet.
The Advanced Recover Cart feature in ActiveWoo helps you catch those lost sales. It connects with ActiveCampaign to track abandoned carts and send follow-up emails automatically. This way, you can remind them what they left behind and encourage them to come back and complete their purchase.
This section explains each setting under the Advanced Recover Cart tab and shows you how to set it up the right way, so you don’t miss out on sales that can still be saved.
Let’s walk through the options, one by one.
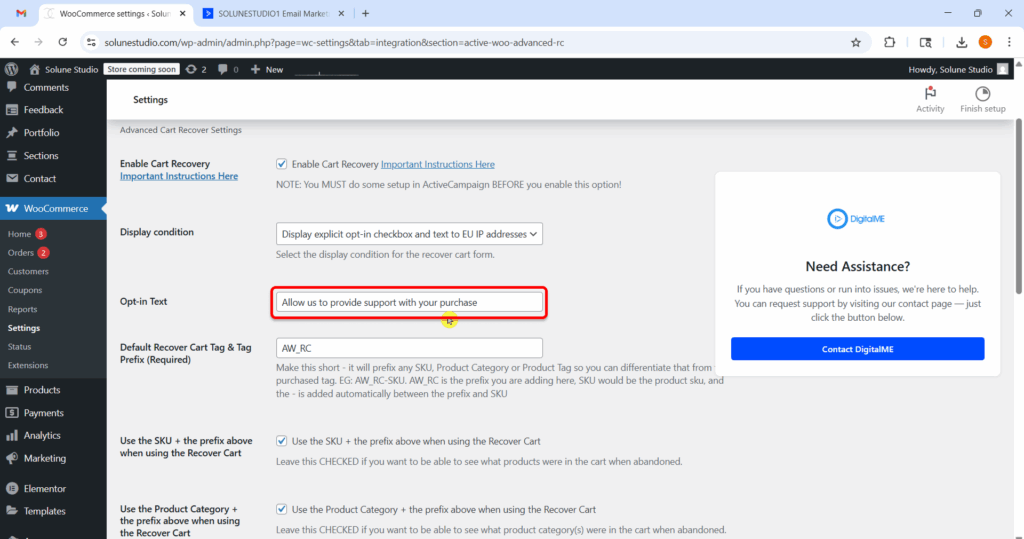
First, we got this Enable recovery cart option. Enabling this option activates the Recover Cart functionality. Once turned on, ActiveWoo will begin tagging customers who abandon their cart and sync that data with ActiveCampaign.
Important Note:
You must first configure the corresponding automation and list inside your ActiveCampaign account. Clicking the “Important Instructions Here” link will guide you through the necessary steps.
When to enable:
Turn this ON once you’re ready to begin cart recovery campaigns and have your ActiveCampaign automations prepared.
This setting controls when and how the Recover Cart form appears to your store visitors. Let’s break down each option so you can decide what’s best for your store setup.
This shows the Recover Cart form to everyone, all the time.
📌 Best for stores that want to capture as many abandoned carts as possible without any restriction.
Instead of showing the form right away, this option asks for permission first. Shoppers will see a checkbox to opt in before their cart details are saved.
📌 Useful if you want to follow privacy best practices or build extra trust with your visitors.
Shows the Recover Cart form only with opt-in consent for users in the EU. Outside the EU, it works as usual (based on your other settings).
Smart choice for hybrid compliance, you stay GDPR-friendly for EU users while keeping things simple for everyone else.
Due to stricter privacy laws (like GDPR), this setting hides the Recover Cart form from users located in the EU.
📌 Pick this if you’re not ready to fully handle EU privacy compliance or want to avoid the legal risk.
If you’re unsure, start with “Always display explicit opt-in checkbox and text”. It’s user-friendly and keeps your store on the safe side, privacy-wise.
Once you’ve enabled cart recovery, the next important step is helping ActiveWoo label abandoned products properly. These labels (or tags) are how ActiveCampaign knows what was left in the cart. This lets you send super relevant emails, like “Hey! You left your hoodie behind”.
Let’s look at the tagging options one by one, and I’ll explain exactly what they do and when to use them.
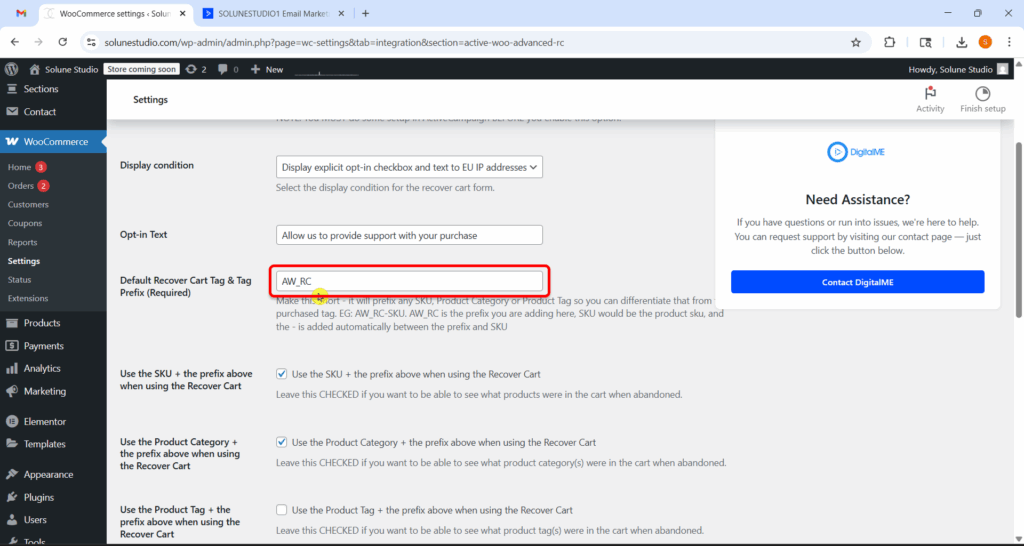
This setting helps you tag abandoned cart data in ActiveCampaign. Tags are super helpful because they let you track which items were left behind and trigger targeted automation (like cart reminder emails).
This is a short word or code (called a “prefix”) that will be added in front of each tag created for abandoned carts. You only need to type this once, and it will automatically be used for every tag that ActiveWoo creates for abandoned cart products.
Let’s say you type this in the box:
AW_RC
Now, imagine a customer adds a product with the SKU HOODIE2025 to their cart but doesn’t complete the purchase.
ActiveWoo will create a tag like:
AW_RC-HOODIE2025
This makes it easy to recognize which tags belong to abandoned carts and separate them from other tags in your ActiveCampaign account.
Tip: Keep it short and recognizable. This tag prefix is like your cart recovery signature.
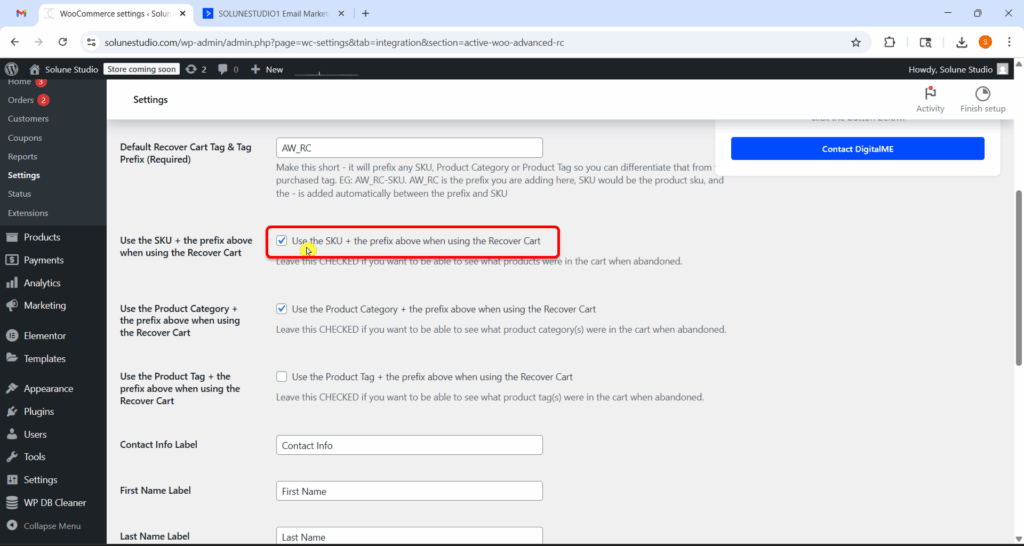
When this box is checked, ActiveWoo will tag each abandoned product using its SKU (which is like a unique product code) plus your chosen prefix.
Let’s say your product has an SKU of TSHIRT123, and your prefix is AW_RC.
The tag that’s created will be:
AW_RC-TSHIRT123
This lets you track exactly which product someone left in their cart. You’ll know what specific item they were interested in, which allows you to send a personalized email like:
“Hi Sarah! You left our comfy T-shirt (TSHIRT123) in your cart. Still thinking about it? Grab it now before it’s gone!”
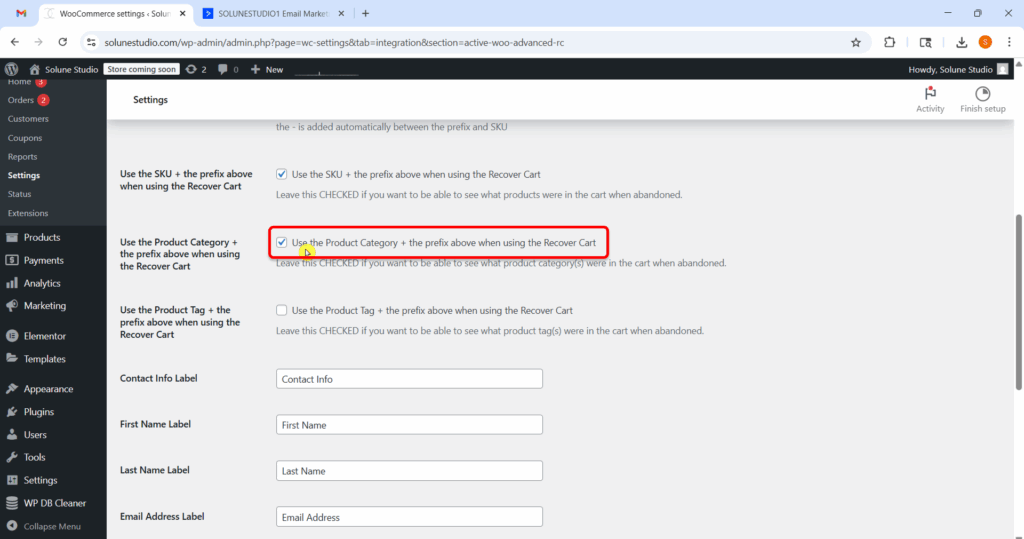
When this feature is checked, ActiveWoo will tag the abandoned cart using the product category instead of the specific SKU.
If the product someone abandoned is in the category “Shoes,” and your prefix is AW_RC, the tag would be:
AW_RC-Shoes
Sometimes it’s better to know what kind of product the customer was interested in, rather than the exact product.
This way, you can send an email like:
“We saw you were browsing shoes! We’ve got some great pairs waiting for you.”
This works well when you have lots of products in the same category and want to run category-based email automations.
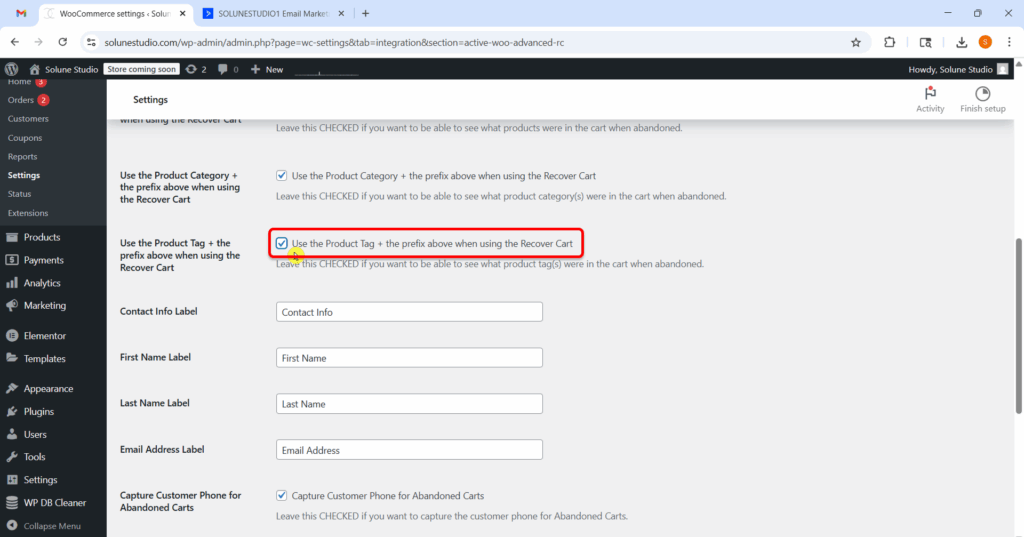
When this feature is checked, ActiveWoo will tag the abandoned cart using WooCommerce product tags.
In WooCommerce, you might tag products with things like:
So if a customer leaves a product with the tag “Summer2025” in their cart, and your prefix is AW_RC, the tag will be:
AW_RC-Summer2025
If you organize your products by collections, seasons, or promotions, this feature lets you tag and target customers based on those themes.
You can then send a follow-up email like:
“Hey! You left something from our Summer 2025 Collection in your cart. Let’s make sure you don’t miss out!”
You can turn on one, two, or all three of these tagging options depending on what kind of information you want to collect:
| Option | What it tells you | Good for |
| SKU | Exact product Left Behind | Personalized recovery emails |
| Category | Type of product | Broad product-focused campaigns |
| Product Tag | Campaign or collection info | Seasonal or tag-based targeting |
These fields define how different pieces of contact information are shown during the cart recovery or checkout process. You can change the default text to better match your store’s tone, language, or branding.
This is the section title that appears above the customer’s personal info fields (first name, last name, email).
Default: Contact Info
You can change this to:
Use something friendly or brand-aligned to make the form more engaging.
This is the label above the field where users enter their first name.
Default: First Name
You can rename it to:
Keep it short and clear to reduce form abandonment.
This label appears above the last name field.
Default: Last Name
You might prefer:
This is the label for the field where users type in their email address, essential for abandoned cart recovery!
Default: Email Address
Alternative ideas:
A clear label reassures customers that their email is used for useful follow-ups (like order confirmations or cart reminders).
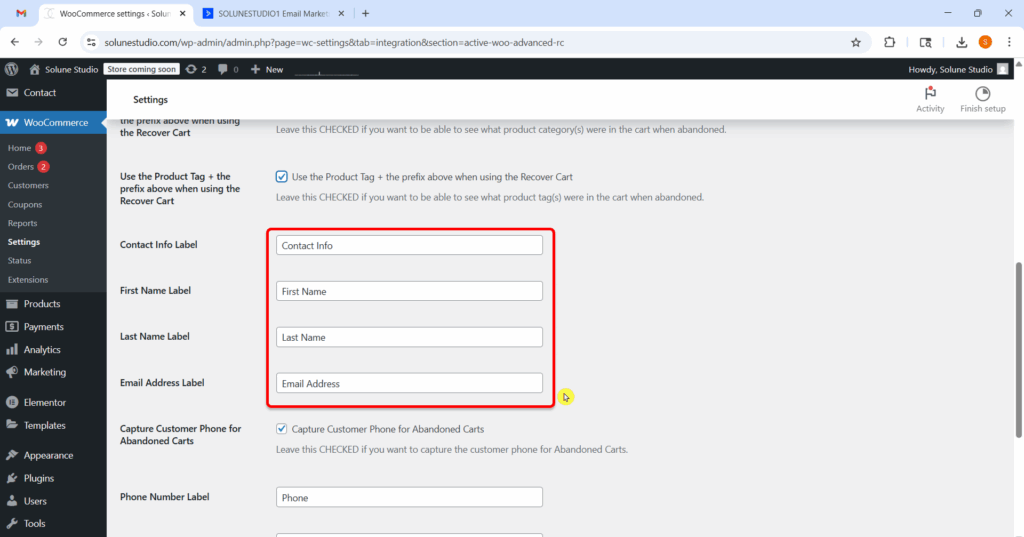
This section helps you collect the customer’s phone number when they start the checkout process but don’t complete the purchase.
When this checkbox is checked, it means ActiveWoo will ask for and save the customer’s phone number during checkout, even if they abandon their cart before completing the order.
If this is unchecked, ActiveWoo won’t collect the phone number for abandoned carts.
Keep this checked if you plan to do SMS marketing or personal outreach. This feature is super useful if you want to:
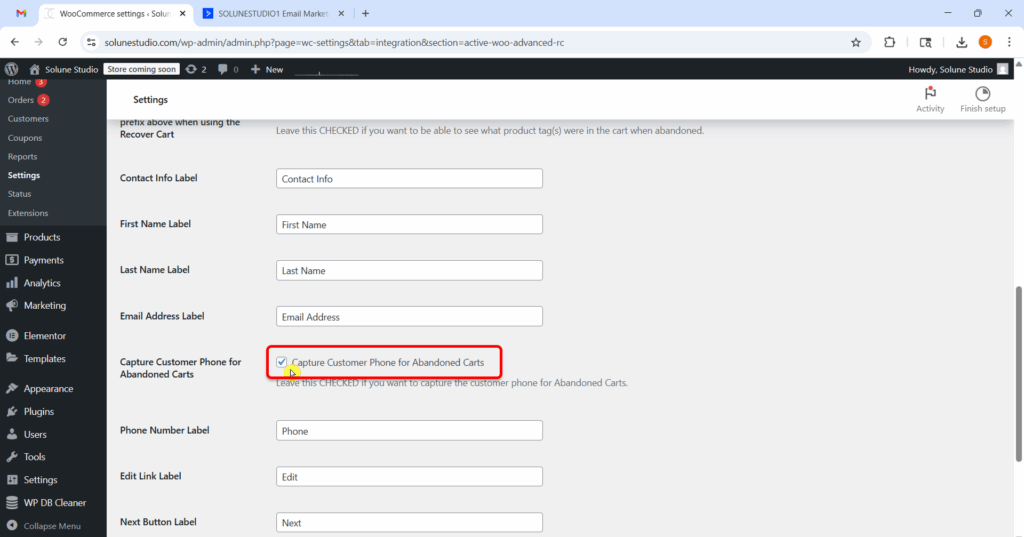
This field controls the label text that appears above or beside the phone number input field.
Default: Phone
You can change it to anything like:
This helps make the form more personalized or match your store’s tone.
This is the text for the “Edit” link that customers see if they want to update their phone number.
Default: Edit
You can change it to something like:
Customizing this gives you a more branded checkout experience.
This is the label on the “Next” button that moves customers to the next step in the checkout process.
Default: Next
You can change it to:
Tip: Use language that matches your store’s style, formal or friendly.
This field controls how the section that collects billing info is titled.
Default: Billing Details
You might want to change it to:
This is just a text label; it doesn’t change how billing works, just how it’s shown.
This is the final button that confirms the customer’s order. You can change the label to make it more action-focused or encouraging.
Default: Confirm Order
You can try:
A clear, action-driven label can boost conversion rates!
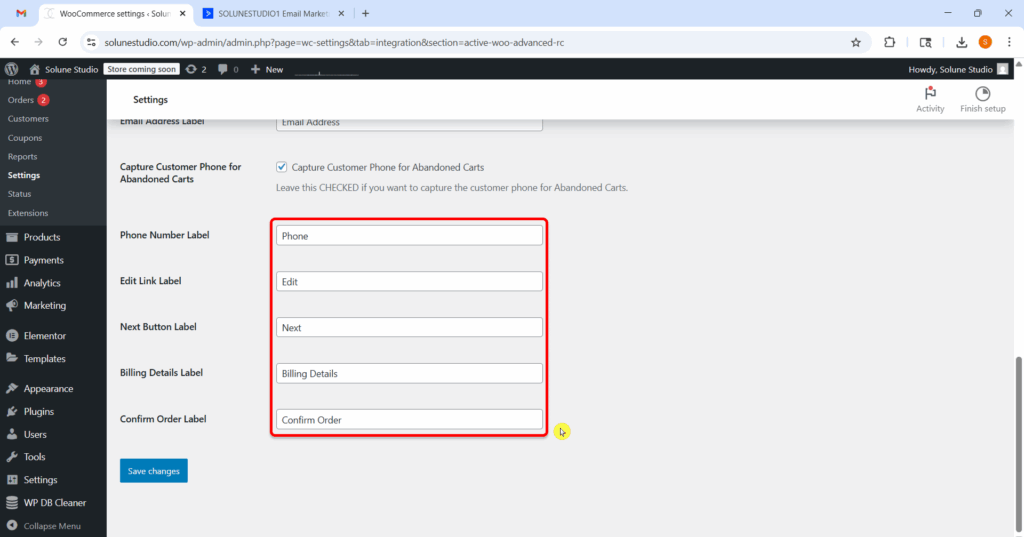
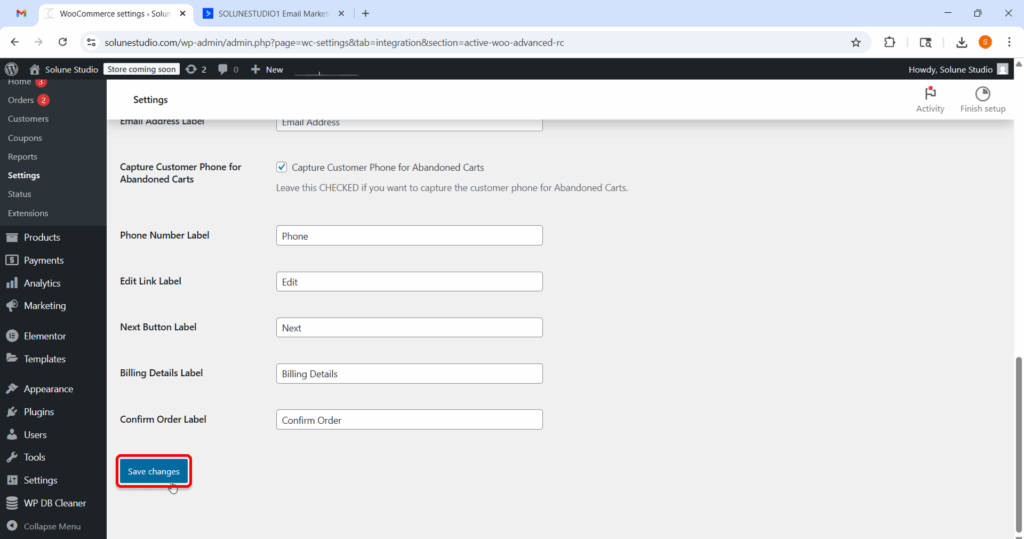
Once you’re happy with all your label edits and settings, don’t forget to hit that blue “Save changes” button! That one simple click locks in all your customizations.
This section is all about giving your checkout form a personalized touch, especially handy if you’re capturing phone numbers to follow up on abandoned carts. A smoother, more branded experience not only looks better but can also increase your recovery rates and drive more conversions.
ActiveWoo gives you the ability to automatically send coupons to customers based on their behavior, whether they abandoned their cart or completed a purchase. You can even send coupons using ActiveCampaign automations via webhooks.
Let’s break down everything you see in this section.
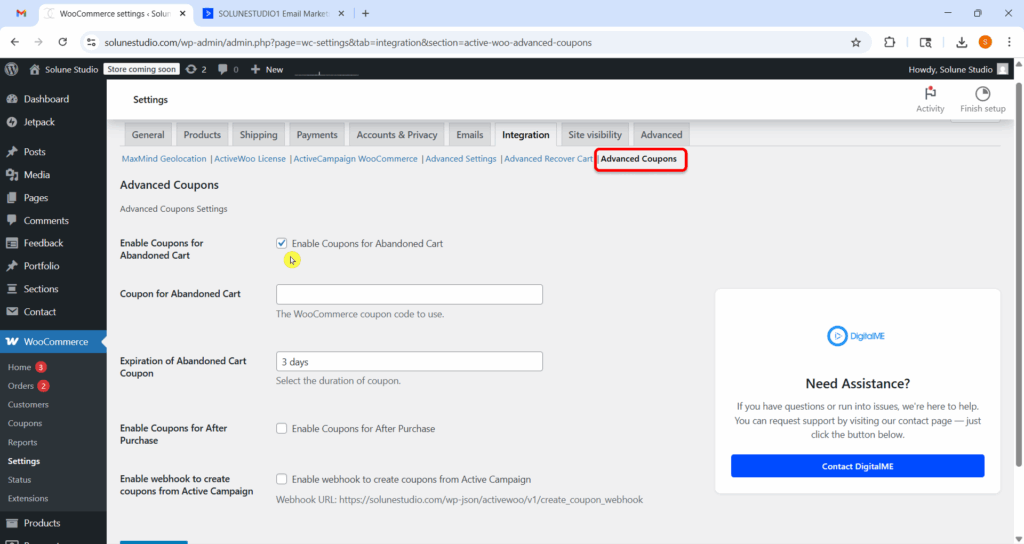
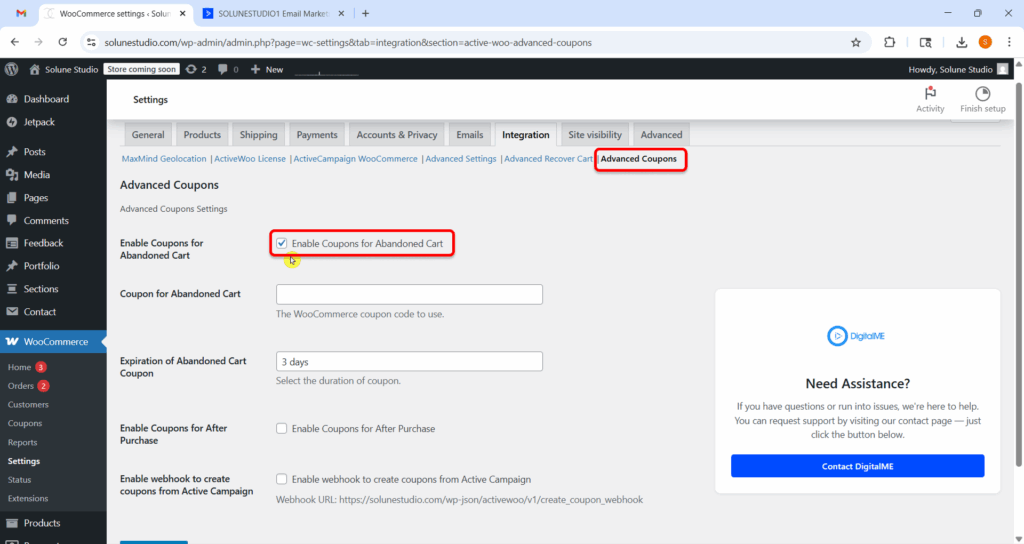
This Feature allows ActiveWoo to send coupons to customers who added items to their carts but didn’t complete the purchase.
Abandoned carts are lost sales. A discount coupon is often the easiest way to bring a customer back. It works like a gentle reminder, with a little reward.
Recommended: Always turn this on if you want to recover abandoned sales.
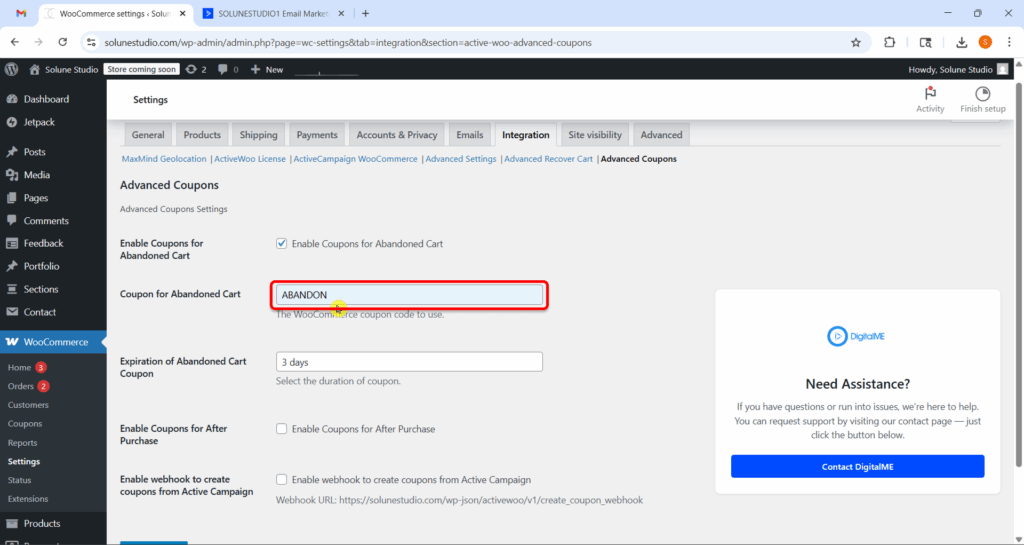
Now you enter the Coupon code here in this field, which you’ve already created in your store.
Example:
This is the exact coupon code ActiveWoo will send when someone abandons their cart.
Note: ActiveWoo doesn’t create the coupon. You must create it first in WooCommerce under Marketing > Coupons.
Now, this checkbox lets you send thank-you coupons after someone completes a purchase.
It’s a great way to encourage repeat purchases. It tells customers: “Thanks for buying, here’s a discount for your next order.”
Recommended: Turn this on to build customer loyalty.
Just like before, enter an existing WooCommerce coupon code here.
Example:
What happens:
Once someone makes a purchase, they’ll receive this coupon as a reward for their next visit.
How long should the “thank-you” coupon last? You decide here.
Example:
This keeps things timely and gently encourages customers to return sooner rather than later.
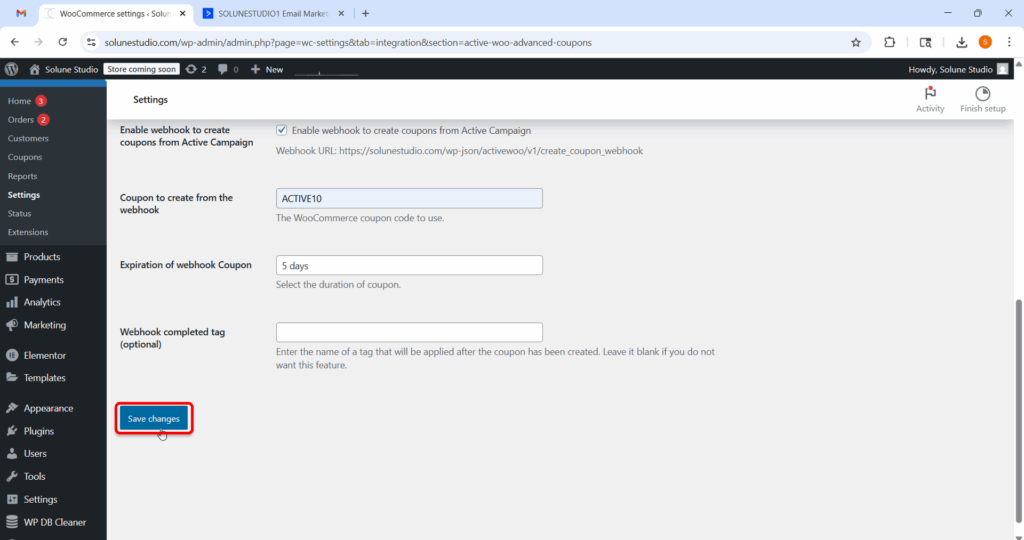
If you’re using ActiveCampaign for marketing automation, ActiveWoo lets you send coupons using a webhook, which means ActiveCampaign can trigger the coupon creation based on your automation rules.
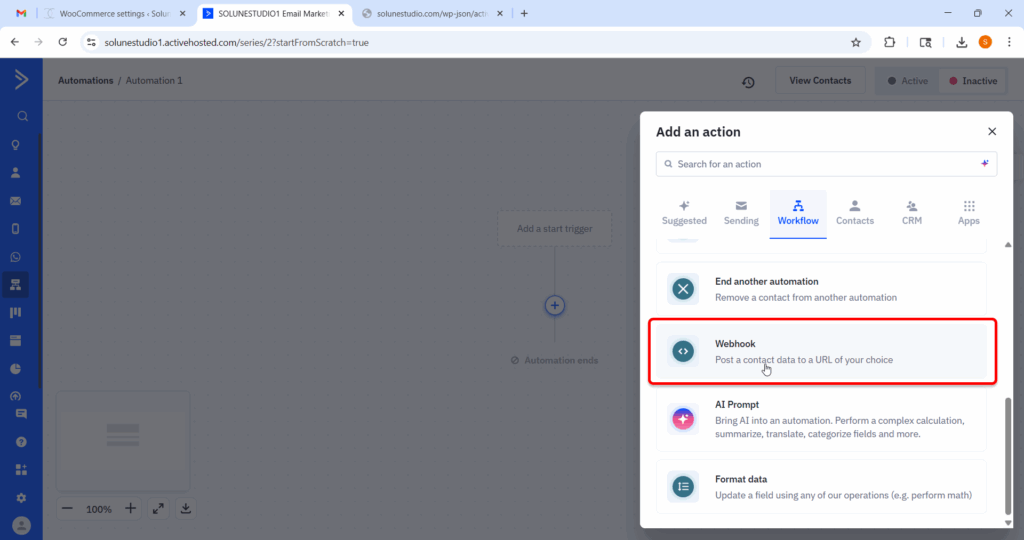
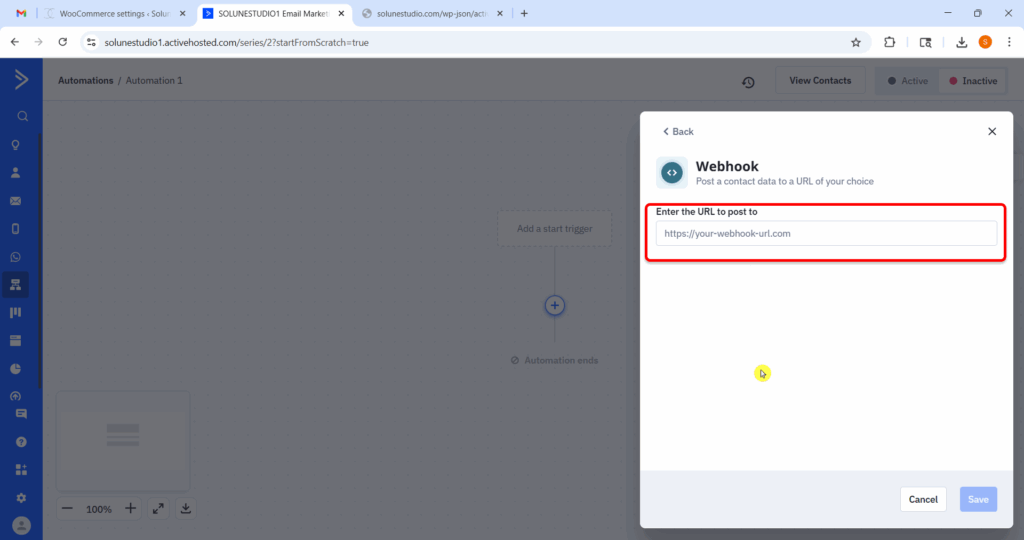
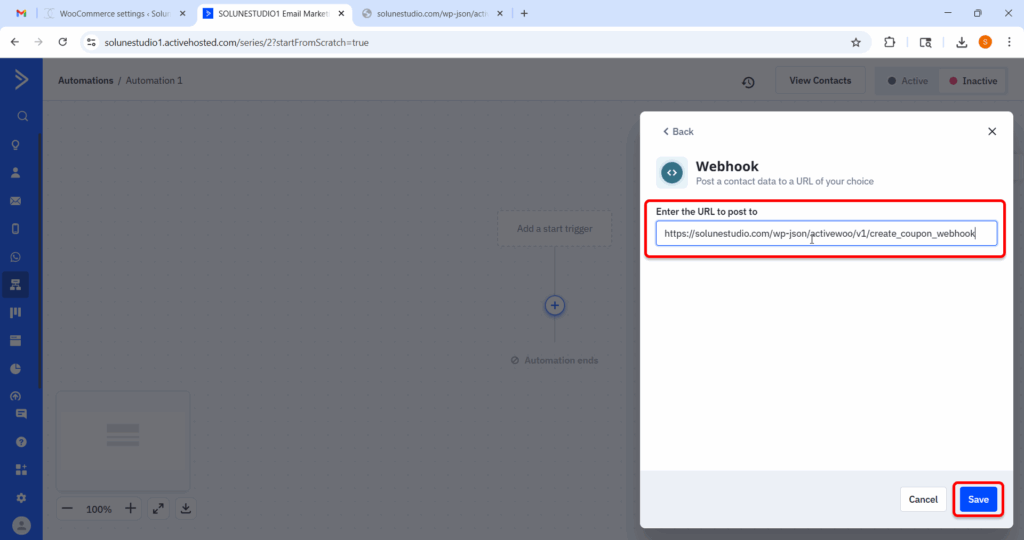
Now, check this box if you want to let ActiveCampaign trigger coupon creation through the webhook URL provided.
Once enabled, your automation can call that webhook and generate a coupon for the user automatically.
Now, here you have to paste the coupon code you want the webhook to generate.
Example:
Now we can set the expiration time for the webhook-generated coupon.
Example:
This helps you maintain control over how long automated coupons can be used.
This is optional, but super helpful if you’re into tagging your contacts in ActiveCampaign.
You can enter a tag name (like coupon_sent), and ActiveWoo will apply it after the coupon is created.
This helps you:
Leave this blank if you’re not using tags.
That’s it, your coupon game is strong! Now sit back and watch those carts get recovered and customers come running back for more.
Congratulations! You’ve successfully set up your WooCommerce store with ActiveCampaign through the ActiveWoo plugin. This integration brings your store to life by automatically syncing your valuable data with your email marketing platform. Now you can effortlessly track customer actions, craft personalized messages, and automate your marketing workflows, all without lifting a finger. Get ready to elevate your marketing game and connect with your customers like never before!
With this integration:
New customers are added to your email lists in real-time
Purchase data can trigger email automation (like thank-you emails or product recommendations)
You can create smarter segments and track customer behavior more effectively
And much more.
It’s a solid step toward a more organized, data-driven workflow, and one that can save you hours of manual work over time.
If something’s not working quite right or you’re unsure about a specific step, no worries, help is just one email away.
You can contact our team at hello@activewoo.com, we’re available 24/7 and always happy to assist with setup issues, syncing problems, or just general questions. We’re here to make sure everything keeps running smoothly.
If you haven’t installed the tools yet, here’s where to get started:
Once both tools are set up, everything you need to build automated email campaigns is right at your fingertips.
That’s it for this tutorial! You’re now ready to move forward with confidence, and if you ever need support or want to explore more advanced features, we’ve got more tutorials on the way.
Thank you so much.